This article is updated for version 1.02 - later versions might differ slightly.
When you feel that the album design is done and everything is in order you are ready to export your creation. On the left bar, the last menu option is "Export Design". Pressing it will open the export section of the application, check the image below:
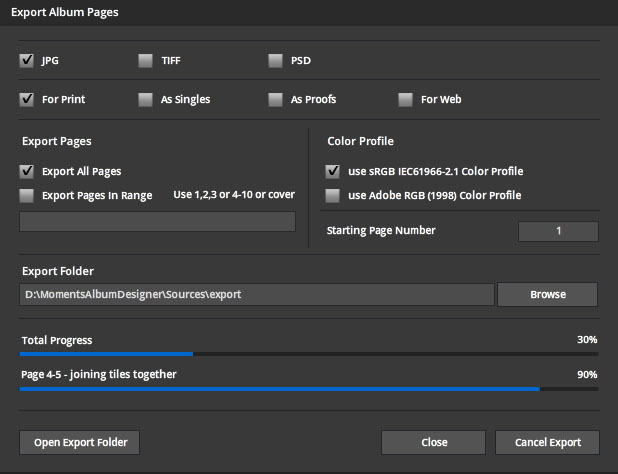
As a professional photographer, Moments Designer fulfills your wedding album design software needs by being packed with tons of export options to choose from, the top ones being the type of export you want: For Print, As Singles, As Proofs, For Web, To PSD.
"For Print" option will export each page/spread or cover at full resolution and dimension, to jpg format, ready to be sent to your printing shop for fabrication. Always double-check the final export product before sending it to be printed.
"As Singles" option allows you to export the album as pages, meaning that the cover and spreads will be cut in half, a spread that is two pages long will be exported as individual pages instead of a collage of the two pages. This option is only suited if your fabrication shop needs the materials delivered in such a form. In most cases the first option, "For Print", is the right one to use.
When "As Proofs" is selected, your design will be exported with a fixed height of 1000px. This is useful when dealing with clients and need to present your work for acceptance before printing the finished album. A fixed height will facilitate the use of an online proof gallery of even a specialized desktop application to showcase the finished product.
Exporting "For Web" will export the album resized, it keeps the aspect ratio, but each spread will have a maximum dimension of 2000px, being width or height, for posting it on a web page or portfolio site.
"To PSD" is an option we're working on at the moment to export the album in Photoshop form for later edit.
Below the first group of options, the left group enables you to export the entire album or just specific pages, by selecting "Range" and, in the text box below, specifying the page number. Separate each entry by a comma. A valid entry will look like 1,2,3 or for specifying a range of pages 6-15, or you can enter cover, for exporting the album's cover.
You can select either sRGB or Adobe RGG as the color profile used at export.
Select where the exported images will be stored by browsing to your desired directory. By default, it exports to the export folder located inside the application.
Press "Start Export" to begin the export process. Progress will be displayed at the bottom by progress bars, the top bar shows the total progress while the one just below it shows the progress of each page. Export is finished when the percent (%) indicator says, "COMPLETE" and the progress bars are at max width.

You can now close the export window and verify the exported slides.